Spring Integration – developing application from the scratch (part 2 / 2)

This is the second part of the tutorial where we are creating an invoices processing application using Spring Integration. In case you missed it, be sure to look at the first part. Previously we’ve defined functional requirements for the system, created gateway, splitter, filter and router component. Let’s continue with creating a transformer.

5. Transforming invoices to the payments

We’ve successfully filtered out “too expensive” invoices from the system now (they might need manual inspection or so). The important thing is that we can now take an invoice and generate payment from it. First, let’s add Payment class to the banking package:

package com.vrtoonjava.banking;

import com.google.common.base.Objects;

import java.math.BigDecimal;

public class Payment {

    private final String senderAccount;
    private final String receiverAccount;
    private final BigDecimal dollars;

    public Payment(String senderAccount, String receiverAccount, BigDecimal dollars) {
        this.senderAccount = senderAccount;
        this.receiverAccount = receiverAccount;
        this.dollars = dollars;
    }

    public String getSenderAccount() {
        return senderAccount;
    }

    public String getReceiverAccount() {
        return receiverAccount;
    }

    public BigDecimal getDollars() {
        return dollars;
    }

    @Override
    public String toString() {
        return Objects.toStringHelper(this)
                .add("senderAccount", senderAccount)
                .add("receiverAccount", receiverAccount)
                .add("dollars", dollars)
                .toString();
    }

}

Because we will have two ways how to create a payment (from local and foreign invoices), let’s define a common contract (interface) for creating payments. Put interface PaymentCreator to the banking package:

package com.vrtoonjava.banking;

import com.vrtoonjava.invoices.Invoice;

/**
 * Creates payment for bank from the invoice.
 * Real world implementation might do some I/O expensive stuff.
 */
public interface PaymentCreator {

    Payment createPayment(Invoice invoice) throws PaymentException;

}

Technically, this is a simple parametrized Factory. Note that it throws PaymentException. We’ll get to the exception handling later, but here’s the code for the simple PaymentException:

package com.vrtoonjava.banking;

public class PaymentException extends Exception {

    public PaymentException(String message) {
        super(message);
    }

}

Now we’re good to add two implementations to the invoices package. First, let’s create LocalPaymentCreator class:

package com.vrtoonjava.invoices;

import com.vrtoonjava.banking.Payment;
import com.vrtoonjava.banking.PaymentCreator;
import com.vrtoonjava.banking.PaymentException;
import org.springframework.integration.annotation.Transformer;
import org.springframework.stereotype.Component;

@Component
public class LocalPaymentCreator implements PaymentCreator {

    // hard coded account value for demo purposes
    private static final String CURRENT_LOCAL_ACC = "current-local-acc";

    @Override
    @Transformer
    public Payment createPayment(Invoice invoice) throws PaymentException {
        if (null == invoice.getAccount()) {
            throw new PaymentException("Account can not be empty when creating local payment!");
        }

        return new Payment(CURRENT_LOCAL_ACC, invoice.getAccount(), invoice.getDollars());
    }

}

Another creator will be ForeignPaymentCreator with rather straightforward implementation:

package com.vrtoonjava.invoices;

import com.vrtoonjava.banking.Payment;
import com.vrtoonjava.banking.PaymentCreator;
import com.vrtoonjava.banking.PaymentException;
import org.springframework.integration.annotation.Transformer;
import org.springframework.stereotype.Component;

@Component
public class ForeignPaymentCreator implements PaymentCreator {

    // hard coded account value for demo purposes
    private static final String CURRENT_IBAN_ACC = "current-iban-acc";

    @Override
    @Transformer
    public Payment createPayment(Invoice invoice) throws PaymentException {
        if (null == invoice.getIban()) {
            throw new PaymentException("IBAN mustn't be null when creating foreign payment!");
        }

        return new Payment(CURRENT_IBAN_ACC, invoice.getIban(), invoice.getDollars());
    }

}

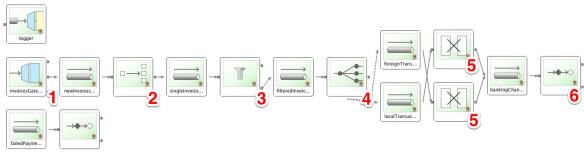
Interesting part about creators is @Transformer annotation. It’s a similar concept as we’ve used with @Filter annotation – only this time we’re telling to Spring Integration that it should use this method for payload transforming logic. Either way we will use foreign or local transformer, so new message will end in bankingChannel channel. Let’s define these new transformers in our schema file:

 
<int:transformer
    input-channel="localTransactions"
    output-channel="bankingChannel"
    ref="localPaymentCreator" />

<int:transformer
    input-channel="foreignTransactions"
    output-channel="bankingChannel"
    ref="foreignPaymentCreator" />

<int:channel id = "bankingChannel">
    <int:queue capacity="1000" />
</int:channel>

6. Passing payments to the banking service (Service Activator)

Payments are ready and messages containing them are waiting in the bankingChannel. The last step of the flow is to use Service Activator component. The way it works is simple – when a new message appears in a channel, Spring Integration invokes logic specified in a Service Activator component. So when a new payment appears in the bankingChannel, we want to pass it to the banking service.
In order to do that we first need to see a contract for the banking service. So put interface BankingService to the banking package (in the real world this would probably reside in some external module):

package com.vrtoonjava.banking;

/**
 * Contract for communication with bank.
 */
public interface BankingService {

    void pay(Payment payment) throws PaymentException;

}

Now we will need an actual implementation of the BankingService. Again, it’s highly unlikely that implementation would reside in our project (it would probably be remotely exposed service), but let’s at least create some mock implementation for the tutorial purposes. Add MockBankingService class to the banking package:

package com.vrtoonjava.banking;

import org.springframework.stereotype.Service;

import java.util.Random;

/**
 * Mock service that simulates some banking behavior.
 * In real world, we might use some web service or a proxy of real service.
 */
@Service
public class MockBankingService implements BankingService {

    private final Random rand = new Random();

    @Override
    public void pay(Payment payment) throws PaymentException {
        if (rand.nextDouble() > 0.9) {
            throw new PaymentException("Banking services are offline, try again later!");
        }

        System.out.println("Processing payment " + payment);
    }

}

Mock implementation creates on some random occasions (~10%) a failure. Of course for the better decoupling we’re not going to use it directly, we will create dependency from our custom component on a contract (interface) instead. Let’s add PaymentProcessor class to the invoices package now:

package com.vrtoonjava.invoices;

import com.vrtoonjava.banking.BankingService;
import com.vrtoonjava.banking.Payment;
import com.vrtoonjava.banking.PaymentException;
import org.springframework.beans.factory.annotation.Autowired;
import org.springframework.integration.annotation.ServiceActivator;
import org.springframework.stereotype.Component;

/**
 * Endpoint that picks Payments from the system and dispatches them to the
 * service provided by bank.
 */
@Component
public class PaymentProcessor {

    @Autowired
    BankingService bankingService;

    @ServiceActivator
    public void processPayment(Payment payment) throws PaymentException {
        bankingService.pay(payment);
    }

}

Again – note the @ServiceActivator annotation. That means that Spring Integration should invoke corresponding method when service activator component comes to the game. To use the service activator we need to add it to the integration schema:

<int:service-activator input-channel="bankingChannel" ref="paymentProcessor">
    <int:poller fixed-rate="500" error-channel="failedPaymentsChannel" />
</int:service-activator>

<int:channel id = "failedPaymentsChannel" />

Note that we’re defining fixed-rate attribute which means that activator will be invoked every half second (if there is some message present in the bankingChannel). We’re also defining error-channel attribute, but we’ll get there just in moment.

Error handling

One of the biggest challenges of messaging systems is to properly identify and handle error situations. Spring Integration provides a technique called “error channels”, where we can (obviously) send error messages from the system. Error channel is just another channel and we can take proper action when an error message appears in this channel. In the real world applications we would probably go for some retry logic or professional reporting, in our sample tutorial we will just print out the cause of the error. In the previous component (Service Activator) we’ve specified error-channel property to refer to the failedPaymentsChannel. When message arrives to this channel we will invoke another Service Activator and print out the error. Here’s the implementation of the FailedPaymentHandler Service Activator:

package com.vrtoonjava.invoices;

import org.springframework.integration.annotation.ServiceActivator;
import org.springframework.stereotype.Component;

@Component
public class FailedPaymentHandler {

    @ServiceActivator
    public void handleFailedPayment(Exception e) {
        System.out.println("Payment failed: " + e);
        // now the system should do something reasonable, like retrying the payment
        // omitted for the tutorial purposes
    }

}

And let’s hook it to the integration schema as usual:

<int:service-activator
    input-channel="failedPaymentsChannel"
    ref="failedPaymentHandler" />

Running the whole thing

We’ll create a job now that will (at fixed rate) send new invoices to the system. It is only a standard Spring bean that utilizes Spring’s @Scheduled annotation. So let’s add a new class – InvoicesJob to the project:

package com.vrtoonjava.invoices;

import org.springframework.beans.factory.annotation.Autowired;
import org.springframework.scheduling.annotation.Scheduled;
import org.springframework.stereotype.Component;

import java.util.ArrayList;
import java.util.Collection;
import java.util.List;

/**
 * Job that every n-seconds generates invoices and sends them to the system.
 * In real world this might be endpoint receiving invoices from another system.
 */
@Component
public class InvoicesJob {

    private int limit = 10; // default value, configurable

    @Autowired
    InvoiceCollectorGateway invoiceCollector;

    @Autowired
    InvoiceGenerator invoiceGenerator;

    @Scheduled(fixedRate = 4000)
    public void scheduleInvoicesHandling() {
        Collection<Invoice> invoices = generateInvoices(limit);
        System.out.println("\n===========> Sending " + invoices.size() + " invoices to the system");
        invoiceCollector.collectInvoices(invoices);
    }

    // configurable from Injector
    public void setLimit(int limit) {
        this.limit = limit;
    }

    private Collection<Invoice> generateInvoices(int limit) {
        List<Invoice> invoices = new ArrayList<>();
        for (int i = 0; i < limit; i++) {
            invoices.add(invoiceGenerator.nextInvoice());
        }

        return invoices;
    }

}

Job invokes (every 4 seconds) InvoicesGenerator and forwards invoices to the Gateway (first component we read about). To make it work we also need InvoicesGenerator class:

package com.vrtoonjava.invoices;

import org.springframework.stereotype.Component;

import java.math.BigDecimal;
import java.util.Random;

/**
 * Utility class for generating invoices.
 */
@Component
public class InvoiceGenerator {

    private Random rand = new Random();

    public Invoice nextInvoice() {
        return new Invoice(rand.nextBoolean() ? iban() : null, address(), account(), dollars());
    }

    private BigDecimal dollars() {
        return new BigDecimal(1 + rand.nextInt(20_000));
    }

    private String account() {
        return "test-account " + rand.nextInt(1000) + 1000;
    }

    private String address() {
        return "Test Street " + rand.nextInt(100) + 1;
    }

    private String iban() {
        return "test-iban-" + rand.nextInt(1000) + 1000;
    }

}

This is only a simple mock facility that’ll allow us to see the system working. In the real world we wouldn’t use any generator but probably some exposed service instead.

Now under resources folder create a new spring config file – invoices-context.xml and declare component scanning and task scheduling support:

<?xml version="1.0" encoding="UTF-8"?>
<beans xmlns = "http://www.springframework.org/schema/beans"
       xmlns:xsi = "http://www.w3.org/2001/XMLSchema-instance" xmlns:task = "http://www.springframework.org/schema/task"
       xmlns:context = "http://www.springframework.org/schema/context"
       xsi:schemaLocation = "http://www.springframework.org/schema/beans http://www.springframework.org/schema/beans/spring-beans.xsd http://www.springframework.org/schema/task http://www.springframework.org/schema/task/spring-task.xsd http://www.springframework.org/schema/context http://www.springframework.org/schema/context/spring-context.xsd">

    <import resource = "invoices-int-schema.xml" />

    <context:component-scan base-package = "com.vrtoonjava.invoices" />
    <context:component-scan base-package = "com.vrtoonjava.banking" />

    <task:executor id = "executor" pool-size="10" />
    <task:scheduler id = "scheduler" pool-size="10" />
    <task:annotation-driven executor="executor" scheduler="scheduler" />

</beans>

To see the whole thing running we need one more last piece – standard Java main application where we will create Spring’s ApplicationContext.

package com.vrtoonjava.invoices;

import org.springframework.context.support.ClassPathXmlApplicationContext;

/**
 * Entry point of the application.
 * Creates Spring context, lets Spring to schedule job and use schema.
 */
public class InvoicesApplication {

    public static void main(String[] args) {
        new ClassPathXmlApplicationContext("/invoices-context.xml");
    }

}

Simply run mvn clean install from command line and launch the main method in InvoicesApplication class. You should be able to see similar output:

===========> Sending 10 invoices to the system
Amount of $3441 can be automatically processed by system
Amount of $17419 can not be automatically processed by system
Processing payment Payment{senderAccount=current-local-acc, receiverAccount=test-account 1011000, dollars=3441}
Amount of $18442 can not be automatically processed by system
Amount of $19572 can not be automatically processed by system
Amount of $5471 can be automatically processed by system
Amount of $1663 can be automatically processed by system
Processing payment Payment{senderAccount=current-iban-acc, receiverAccount=test-iban-2211000, dollars=5471}
Amount of $13160 can not be automatically processed by system
Amount of $2213 can be automatically processed by system
Amount of $1423 can be automatically processed by system
Processing payment Payment{senderAccount=current-iban-acc, receiverAccount=test-iban-8051000, dollars=1663}
Amount of $1267 can be automatically processed by system
Payment failed: org.springframework.integration.MessageHandlingException: com.vrtoonjava.banking.PaymentException: Banking services are offline, try again later!
Processing payment Payment{senderAccount=current-iban-acc, receiverAccount=test-iban-6141000, dollars=1423}
Processing payment Payment{senderAccount=current-local-acc, receiverAccount=test-account 6761000, dollars=1267}

Spring Integration – developing application from the scratch (part 1 / 2)

Before we start

In this tutorial you will learn what is Spring Integration, how to use it and what kind of problems does it help to solve. We will build a sample application from the scratch and demonstrate some of the core components of Spring Integration. If you’re new to Spring check out another tutorial on Spring written by me – Shall we do some Spring together? Also note that you don’t need any special tooling, however you can get the best experience for building Spring Integration applications either with IntelliJ IDEA or Spring Tool Suite (you can get some fancy-looking diagrams with STS).

You can either follow this tutorial step-by-step and create application from the scratch yourself, or you can go ahead and get the code from github:
DOWNLOAD SOURCES HERE: https://github.com/vrto/spring-integration-invoices
Whichever way you prefer, it’s time to get started!

Application for processing invoices – functional description

Imagine that you’re working for some company that periodically receives a large amount of invoices from various contractors. We are about to build a system that will be able to receive invoices, filter out relevant ones, create payments (either local or foreign) and send them to some banking service. Even though the system will be rather naive and certainly not enterprise-ready, we will try to build it with good scalability, flexibility and decoupled design in the mind.

Before you go on, you must realize one thing: Spring Integration is (not only, but mostly) about messaging. Spring Integration is basically an embedded enterprise service bus that lets you seamlessly connect your business logic to the messaging channels. Messages can be handled both programmatically (via Spring Integration API) or automatically (by framework itself – higher level of decoupling). Message is the thing that travels across channels. Message has headers and payload – which will be in our case the actual relevant content (domain classes).

Let’s take a look at the following picture which is a summary of the system and walk over important pieces:

integration-invoices.png
On the picture you can see an integration diagram that illustrates our messaging structure and core components of the system – they are marked with red numbers. Let’s walk over those (we will get back to each component in more detail later):

  1. Invoices Gateway – this is the place where we will put new invoices so they can enter the messaging layer
  2. Splitter – the system is designed to accept a collection of invoices, but we will need to process each invoice individually. More specifically, message with payload of Collection type will be split to the multiple messages, where each message will have individual invoice as a payload.
  3. Filter – Our system is designed to automatically process only those invoices that issue less than $10,000
  4. Router – Some invoices use IBAN account numbers and we have two different accounts – one for the local transactions and one for the foreign transactions. The job of a router component is to send a message carrying invoice to the correct channel – either for local invoices, or for the foreign invoices.
  5. Transformers – While we accept Invoices in to the system, our banking APIs work with other types – Payments. Job of the transformer component is to take some message and transform it to another message according to provided logic. We want to transform the payload of original message (invoice) to the new payload – payment.
  6. Banking Service Activator – After we have processed invoices and generated some actual payments we’re ready to talk to the external banking system. We have exposed service of such systems and when message carrying payment enters the correct (banking) channel, we want to activate some logic – passing the payment to the bank and let the bank do further processing.

Creating the project

By now you should have a high level overview of what the system does and how is it structured. Before we start coding you will need an actual Maven project and set up the structure and required dependencies. If you’re familiar with Maven then see pom.xml file below, else if you want to save some time you’re welcome to use a project template I’ve created for you: download the Maven project template.

<?xml version="1.0" encoding="UTF-8"?>
<project xmlns="http://maven.apache.org/POM/4.0.0"
         xmlns:xsi="http://www.w3.org/2001/XMLSchema-instance"
         xsi:schemaLocation="http://maven.apache.org/POM/4.0.0 http://maven.apache.org/xsd/maven-4.0.0.xsd">
    <modelVersion>4.0.0</modelVersion>

    <groupId>spring-integration-invoices</groupId>
    <artifactId>spring-integration-invoices</artifactId>
    <version>1.0-SNAPSHOT</version>

    <dependencies>
        <dependency>
            <groupId>org.springframework</groupId>
            <artifactId>spring-context</artifactId>
            <version>3.2.1.RELEASE</version>
        </dependency>
        <dependency>
            <groupId>org.springframework.integration</groupId>
            <artifactId>spring-integration-core</artifactId>
            <version>2.2.1.RELEASE</version>
        </dependency>

        <dependency>
            <groupId>log4j</groupId>
            <artifactId>log4j</artifactId>
            <version>1.2.16</version>
        </dependency>
        <dependency>
            <groupId>com.google.guava</groupId>
            <artifactId>guava</artifactId>
            <version>13.0.1</version>
        </dependency>
        <dependency>
            <groupId>org.testng</groupId>
            <artifactId>testng</artifactId>
            <version>6.5.2</version>
        </dependency>
    </dependencies>

    <build>
        <plugins>
            <plugin>
                <groupId>org.apache.maven.plugins</groupId>
                <artifactId>maven-compiler-plugin</artifactId>
                <configuration>
                    <source>1.7</source>
                    <target>1.7</target>
                </configuration>
            </plugin>
        </plugins>
    </build>

</project>

Let’s now walk over the six major components of the system in more details and get hands on the actual code.

1. Invoices Gateway

First, let’s see the code for Invoice – which will be one of the core classes in our system. I will be using package com.vrtoonjava as root package, and invoices and banking as sub-packages:

package com.vrtoonjava.invoices;

import com.google.common.base.Objects;

import java.math.BigDecimal;

public class Invoice {

    private final String iban;
    private final String address;
    private final String account;
    private final BigDecimal dollars;

    public Invoice(String iban, String address, String account, BigDecimal dollars) {
        this.iban = iban;
        this.address = address;
        this.account = account;
        this.dollars = dollars;
    }

    public boolean isForeign() {
        return null != iban && !iban.isEmpty();
    }

    public String getAddress() {
        return address;
    }

    public String getAccount() {
        return account;
    }

    public BigDecimal getDollars() {
        return dollars;
    }

    public String getIban() {
        return iban;
    }

    @Override
    public String toString() {
        return Objects.toStringHelper(this)
                .add("iban", iban)
                .add("address", address)
                .add("account", account)
                .add("dollars", dollars)
                .toString();
    }

}

Imagine that we’re getting invoices from an another system (be it database, web-service or something else), but we don’t want to couple this part to the integration layer. We will use Gateway component for that purpose. Gateway introduces a contract that decouples client code from the integration layer (Spring Integration dependencies in our case). Let’s see the code for InvoiceCollectorGateway:

package com.vrtoonjava.invoices;

import java.util.Collection;

/**
 * Defines a contract that decouples client from the Spring Integration framework.
 */
public interface InvoiceCollectorGateway {

    void collectInvoices(Collection<Invoice> invoices);

}

Now, to actually use the Spring Integration we need to create a standard Spring configuration file and use Spring Integration namespace. To get started, here’s invoices-int-schema.xml file. Put it into src/main/resources. Note that we’ve already defined a logging-channel-adapter – which is a special channel where we will send messages from the logger. We’re also using wire-tap – you can think of it as sort of global interceptor that will send logging-related messages to the logger channel.

<?xml version="1.0" encoding="UTF-8"?>
<beans xmlns = "http://www.springframework.org/schema/beans"
       xmlns:xsi = "http://www.w3.org/2001/XMLSchema-instance"
       xmlns:int = "http://www.springframework.org/schema/integration"
       xsi:schemaLocation = "http://www.springframework.org/schema/beans http://www.springframework.org/schema/beans/spring-beans.xsd http://www.springframework.org/schema/integration http://www.springframework.org/schema/integration/spring-integration.xsd">

    <!-- intercept and log every message -->
    <int:logging-channel-adapter id="logger" level="DEBUG" />
    <int:wire-tap channel = "logger" />
</beans>

Let’s get back to our gateway now. We’ve defined a gateway interface – that is the dependency that client will use. When client calls collectInvoices method, gateway will send a new message (containing List payload) to the newInvoicesChannel channel. That leaves client decoupled from the messaging facilities, but lets us place the result to the real messaging channel. To configure gateway, add following code to the integration schema config:

<int:channel id = "newInvoicesChannel" />

<int:gateway id="invoicesGateway"
     service-interface="com.vrtoonjava.invoices.InvoiceCollectorGateway">
    <int:method name="collectInvoices" request-channel="newInvoicesChannel" />
</int:gateway>

2. Invoices Splitter

From the Gateway we’re sending one big message to the system that contains a collection of invoices – in other words – Message has payload of Collection type. As we want to process invoices individually, we will get the result from the newInvoicesChannel and use a splitter component, that will create multiple messages. Each of these new messages will have a payload of Invoice type. We will then place messages to the new channel – singleInvoicesChannel. We will use a default Splitter that Spring Integration provides (by default Spring Integration uses DefaultMessageSplitter that does exactly what we want). This is how we define splitter:

<int:splitter
        input-channel="newInvoicesChannel"
        output-channel="singleInvoicesChannel" />

<int:channel id = "singleInvoicesChannel" />

3. Filtering some invoices

A business use case of our system requires us to automatically process only those invoices that that issue us less than $10,000. For this purpose we will introduce a Filter component. We will grab messages from the singleInvoicesChannel, apply our filtering logic on them, and then write matched results to the new filteredInvoicesChannel channel. First, let’s create a standard Java class that will contain filtering logic for single invoice. Note that we use @Component annotation (which makes it a standard Spring bean) and we annotate filtering method with @Filter annotation – that will tell Spring Integration to use this method for filtering logic:

package com.vrtoonjava.invoices;

import org.springframework.integration.annotation.Filter;
import org.springframework.stereotype.Component;

@Component
public class InvoiceFilter {

    public static final int LOW_ENOUGH_THRESHOLD = 10_000;

    @Filter
    public boolean accept(Invoice invoice) {
        boolean lowEnough =
                invoice.getDollars().intValue() < LOW_ENOUGH_THRESHOLD;
        System.out.println("Amount of $" + invoice.getDollars()
                + (lowEnough ? " can" : " can not")
                + " be automatically processed by system");

        return lowEnough;
    }

}

Note that this is a standard POJO that we can easily unit test it! As I’ve said before – Spring Integration doesn’t tightly couple us to its messaging facilities. For the sake of brevity, I am not pasting unit tests in this tutorial – but if you’re interested go ahead and download github project and see the tests for yourself.

Let’s specify input/output channels for the messaging layer and hook the filter in. Add the following code to the integration schema config:

<int:filter
    input-channel="singleInvoicesChannel"
    output-channel="filteredInvoicesChannel"
    ref="invoiceFilter" />

<int:channel id = "filteredInvoicesChannel" />

4. Routing invoices

So far, we’ve splitted and filtered out some invoices. Now it’s time to inspect contents of the each invoice more closely and decide, whether it is an invoice issued from the current country (local), or from an another country (foreign). In order to do that we can approach as before and use custom class for routing logic. We will (for the sake of demonstration purposes) take the other approach now – we will put Spring Expression Language (SpEL) to use and handle routing completely declaratively. Remember isForeign method on Invoice class? We can directly invoke it with SpEL in router declaration (by using selector-expression attribute)! Router will take a look on the payload, evaluate whether it’s a foreign or a local invoice and forward it to the corresponding channel:

<int:recipient-list-router input-channel="filteredInvoicesChannel">
    <int:recipient channel = "foreignTransactions" selector-expression="payload.foreign" />
    <int:recipient channel = "localTransactions" selector-expression="!payload.foreign" />
</int:recipient-list-router>

<int:channel id = "foreignTransactions" />
<int:channel id = "localTransactions" />

We will continue developing this application in the second part of this tutorial.

Also interested in Apache Camel? Check out this tutorial implemented with Apache Camel instead of Spring Integration!